Node-RED Tutorial for Integrating a Hyperledger Composer Business Network
This tutorial demonstrates how to integrate an existing system of record data source into the blockchain ledger. In this guide, we will build on the Developer Tutorial, extending it to bulk load records from a JSON text file data source to populate Participant and Asset registries in the sample 'Commodity Trading' business network.
Node-RED is a lightweight Open Source integration technology, written in JavaScript. It uses a graphical flow to integrate different nodes, where nodes can receive data, transform data and output data.
Node-RED is commonly used to rapidly prototype Internet of Things style applications, or to wire existing Internet services together.
You can use the Hyperledger Composer Node-RED contribution to:
- Submit transactions
- Read and update assets and participants
- Subscribe to events
- Delete assets and participants
- Perform a bulk load (eg. loading test data)
This tutorial gives an overview of the techniques and resources available to apply to your own use case.
This tutorial uses the tutorial-network business network developed and deployed in the Developer Tutorial.
Prerequisites
Before beginning this tutorial:
- Complete the development environment installation.
- Complete the developer tutorial.
This tutorial assumes the reader has some familiarity with Node-RED. The Node-RED website has an introductory video and a getting started link.
Step One: Install and Start Node-RED
Node-RED is a Node.js application and should be installed on a development environment with the following command npm install -g node-red
Use the following command to start Node-RED node-red
The command output will show that Node-Red server is now running at http://127.0.0.1:1880/ - open this link in a Browser to see the Node-RED UI.
Step Two: Install Composer Nodes
The Composer Nodes for Node-RED are described here https://www.npmjs.com/package/node-red-contrib-composer and can be installed into Node-RED through the UI.
On the Node-RED UI Menu, click Manage palette, the click on the Install tab. In the search modules field type node-red-contrib-composer, then click the Install button and on the confirmation dialog click the red Install button.
The nodes take a few moments to install, and a message will be shown in the UI and in the terminal window where Node-RED was started.
Verify that the nodes are installed by scrolling to the end of the Palette on the left of the UI - a new category called Hyperledger should be at the bottom with the three nodes.
Step Three: Install fs Node
This tutorial uses JSON data from text files and needs additional nodes node-red-contrib-fs
On the Node-RED UI Menu, click Manage palette, the click on the Install tab. In the search modules field type node-red-contrib-fs, then click the Install button and on the confirmation dialog click the red Install button.
Verify that the fs file lister node has been added to the Storage category on the Palette.
Step Four: Build Flow
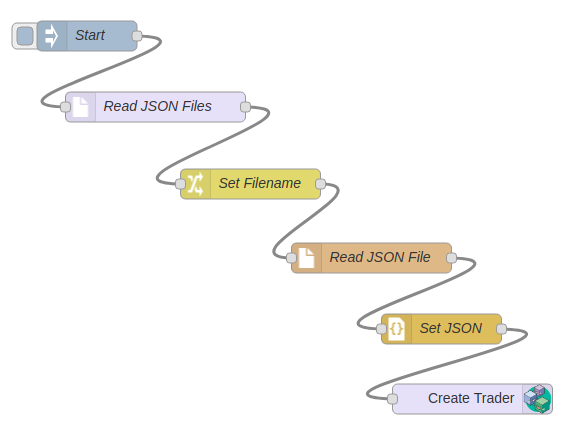
The image below shows what the completed flow will look like.
Drag the nodes from the palette on the left onto the Flow.
Double click on a node to edit the properties.
The types and properties of the six nodes are described below:
1. inject node (from input category) - Start
Set the properties for this node:
Payload - timestamp
Topic - <empty>
Repeat - none
Inject once at start? - <unchecked>
Name - Start
In this flow the inject node is being used primarily to initiate the flow, rather than to inject data. In this flow the data will come from JSON files on disk.
2. fs file lister node (from storage category) - Read JSON Files
Set the properties for this node:
Start Folder - /home/<username>/tutorial-network/testdata/traders/
File Pattern - *.json
Include full path in output? - <checked>
Output single message (array)? - <unchecked>
Max, search depth - 0
Return file details? - <unchecked>
Name - Read JSON Files
For the Start Folder, on Ubuntu Linux substitute <username> for the logged in user. On Mac adjust the Foldername to reflect your system. In the next step of the tutorial test data will be created in this folder. Use the full path of the folder - using the ~/ notation to indicate the user's home folder will cause an error.
3. change node (from function category) - Set Filename
Set the properties for this node:
Name - Set Filename
Rules
- Set - msg.filename
- to - msg.payload (Be sure to change the dropdown to msg )
This node sets the filename variable for the next node in the flow.
4. file in node (from storage category) - Read JSON File
Set the properties for this node:
Filename - <empty>
Repeat - a single utf8 string
Send message on error (legacy mode) - <checked>
Name - Read JSON File
This node reads the JSON test data file into a String variable.
5. json node (from function category) - Set JSON
Set the properties for this node:
Name - Set JSON
Format JSON string - <checked>
This node converts the JSON string into a JavaScript object for the next node in the flow.
6. composer out node (from Hyperledger category) - Create Trader
Set the properties for this node:
Name - Create Trader
Action Type - Create
Click the pencil icon to add a new Composer Card.
- Card Name - admin@tutorial-network This is the Hyperledger Composer node that will connect to the Business Network on the Fabric and submit the Transaction.
After you have set the properties on all the nodes, Wire the nodes together as shown in the diagram above. Remember to click the red Deploy button to save the flow.
Step Five: Create Test Data
Create JSON text files for new Participants
Using a text editor such as vi or gedit , create a text file called /home/<username>/tutorial-network/testdata/traders/trader4.json with the following contents
{
  "$class": "org.acme.biznet.Trader",
  "tradeId": "TRADER4",
  "firstName": "John",
  "lastName": "Smith"
}
Create two more JSON text files for trader5 and trader6 with the following data
{
  "$class": "org.acme.biznet.Trader",
  "tradeId": "TRADER5",
  "firstName": "Simon",
  "lastName": "Jenkins"
}
{
  "$class": "org.acme.biznet.Trader",
  "tradeId": "TRADER6",
  "firstName": "Susan",
  "lastName": "Stone"
}
Create JSON text files for new Commodities
Create a text file called /home/<username>/tutorial-network/testdata/commodities/diamond.json with the following contents
{
  "$class": "org.acme.biznet.Commodity",
  "tradingSymbol": "DIA",
  "description": "Diamond commodity",
  "mainExchange": "Jewel",
  "quantity": 1.45,
  "owner": "resource:org.acme.biznet.Trader#TRADER6"
}
Create two more JSON text files for apple and oil with the following data
{
  "$class": "org.acme.biznet.Commodity",
  "tradingSymbol": "APP",
  "description": "Apple commodity",
  "mainExchange": "Food",
  "quantity": 234500,
  "owner": "resource:org.acme.biznet.Trader#TRADER4"
}
{
 "$class": "org.acme.biznet.Commodity",
 "tradingSymbol": "CL",
 "description": "Crude Oil",
 "mainExchange": "NYMEX",
 "quantity": 35,
 "owner": "resource:org.acme.biznet.Trader#TRADER5"
}
Step Six: Test Flow
Click on the left edge of the Start node to test the flow.
Use the Playground, REST server or the following command to validate that the test data has been added
composer network list -c admin@tutorial-network
Step Seven: Add Commodities
In the previous step the flow has been run and the participants (Traders) have been added. Test data has been created for new Assets (Commodities) and a small re-configuration is required to add them.
Double Click the Read JSON Files node and modify the property Start Folder to reference your commodities test data folder.
Click the Deploy buton the save and deploy the change.
Start the flow and validate that the Commodity test data has been added.
Possible errors
Any Errors will be dislayed on the debug tab in the UI, and on the terminal window where Node-RED was started.
[error] [fs-file-lister:Read JSON Files] Error processing folder listing --
Incorrectly specified folder name in Read JSON Files Node.
[error] [hyperledger-composer-out:Create Trader] Error: creating resource error Namespace is not defined for type org.acme.biznetttt.Commodity -- Errors in the test data - namespace errors or formatting errors in the JSON files.
[error] [hyperledger-composer-out:Create Trader] Error trying to query business network. Error: Connect FailedFabric --
Containers not started - use docker ps to check.
[error] [hyperledger-composer-out:Create Trader] Error: creating resource error Card not found: admin@exampleyz-networkWrong Business Network Card specified --
verify card name by using composer card list on command line.