Generating a REST API
Installing the REST server
The Hyperledger Composer REST server can be installed either using npm or Docker.
To install with npm, run the following command:
npm install -g composer-rest-server@0.20
To install the REST server using Docker see deploying the REST server.
Running the REST server
Hyperledger Composer includes a standalone Node.js process that exposes a business network as a REST API. The LoopBack framework is used to generate an Open API, described by a Swagger document.
To launch the REST Server simply type:
composer-rest-server
You will then be asked to enter a few simple details about your business network. An example of consuming a deployed business network is shown below.
? Enter the name of the business network card to use: admin@basic-sample-network
? Specify if you want namespaces in the generated REST API: always use namespaces
? Specify if you want to enable authentication for the REST API using Passport: No
? Specify if you want to enable event publication over WebSockets: Yes
? Specify if you want to enable TLS security for the REST API: No

To restart the REST server using the same options, issue the following command:
   composer-rest-server -c admin@basic-sample-network -n always -w true

Discovering types from business network definition ...
Discovered types from business network definition
Generating schemas for all types in business network definition ...
Generated schemas for all types in business network definition
Adding schemas for all types to Loopback ...
Added schemas for all types to Loopback
Web server listening at: http://localhost:3000
Browse your REST API at http://localhost:3000/explorer
The composer-rest-server command
The composer-rest-server command has a number of options used to define security and authentication:
Options:
  -c, --card            The name of the business network card to use  [string]
  -n, --namespaces      Use namespaces if conflicting types exist  [string] [choices: "always", "required", "never"] [default: "always"]
  -p, --port            The port to serve the REST API on  [number]
  -y, --apikey          The API key to get access to the REST API [string] [default:undefined]
  -a, --authentication  Enable authentication for the REST API using Passport  [boolean] [default: false]
  -m, --multiuser       Enable multiple user and identity management using wallets (implies -a)  [boolean] [default: false]
  -w, --websockets      Enable event publication over WebSockets  [boolean] [default: true]
  -t, --tls             Enable TLS security for the REST API  [boolean] [default: false]
  -e, --tlscert         File containing the TLS certificate  [string] [default: "/usr/local/lib/node_modules/composer-rest-server/cert.pem"]
  -k, --tlskey          File containing the TLS private key  [string] [default: "/usr/local/lib/node_modules/composer-rest-server/key.pem"]
  -u, --explorer        Enable the test explorer web interface  [boolean] [default: true]
  -d, --loggingkey      Specify the key to enable dynamic logging for the rest server (just pressing enter will not enable this feature)  [string]
  -h, --help            Show help  [boolean]
  -v, --version         Show version number  [boolean]
Dynamic Rest Server logging
Logging of the rest server can be controlled in the same way as other composer applications. However to do so requires the rest server to be started with environment variables set and at that point it logs continuously. This has disadvantages of creating large logs, reducing performance of the rest server and if logging is required the rest server needs to be restarted which may be a cumbersome task to achieve.
You can enable dynamic rest server logging by specifying a key. This key is used as part of the URL path. This means that unless someone knows the key, even if they are authenticated, they cannot change the logging of the rest server.
For example if a key of 45645-575835-A58684 has been set for the logging key, you can either use the rest server explorer (under the Admin section) to alter logging or write an application or use curl. For example in a simple case, assuming authentication is disabled you could do
curl -X POST 'http://localhost:3000/api/admin/loglevel/45645-575835-A58684/composer%5Bdebug%5D%3A*/true/false'
This sets the debug to composer[debug]:*, the first boolean value says whether to send output to the console, the second boolean value says whether to send it to the file system. In the above example it states to send logging to the console and not to the file system. The response looks like this
{
    "oldlevel":"composer[error]:*",
    "newlevel":"composer[debug]:*",
    "oldConsoleLevel":"none",
    "newConsoleLevel":"silly",
    "oldFileLevel":"silly",
    "newFileLevel":"none"
}
indicating what the values were before and what they are now.
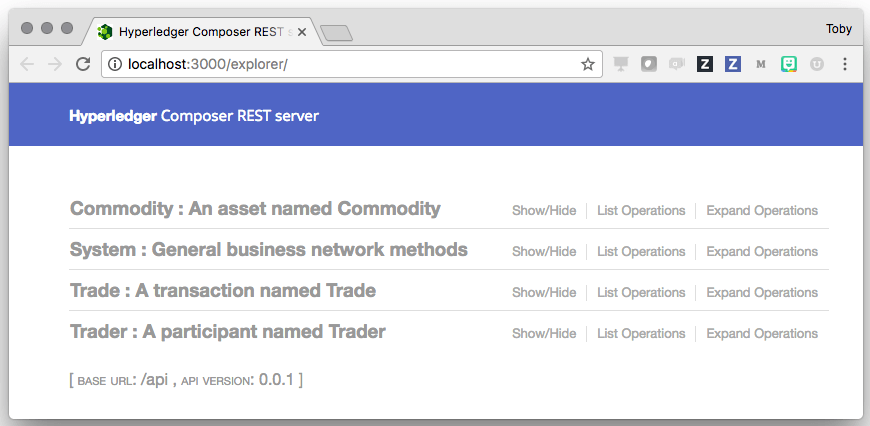
Looking at the generated APIs
Launch your browser and go to the URL given (http://0.0.0.0:3000/explorer). You'll see a screen similar to this.
Updating the REST server
After updating a business network definition, the REST server can be updated to generate new APIs reflecting the updates to the business network definition.
To update the REST server, first the REST server must be stopped using ctrl-C. Then the REST server can be restarted using composer-rest-server.
Generating a REST API with an APIKEY
An API key can be used to provide a first layer of security to access the REST API in development environment.
composer-rest-server -y YOUR_API_KEY
This will accept only request with an Header x-api-key set with the value of YOUR_API_KEY.
Summary
Using the Loopback framework on top of the Hyperledger Composer runtime has allowed us to generate a business domain specific REST API based on the deployed business network model!