Business Network Cards
A Business Network Card provides all of the information needed to connect to a blockchain business network. It is only possible to access a blockchain Business Network through a valid Business Network Card. A Business Network Card contains and Identity for a single Participant within a deployed business network. Business Network Cards are used in the Hyperledger Composer Playground to connect to deployed Business Networks. You can have multiple Business Network Cards for a single deployed Business Network, where those Business Network Cards belong to multiple Participants.
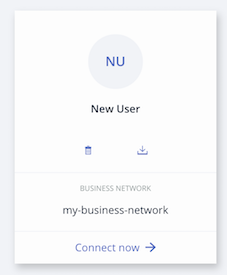
Business Network Cards are grouped under a Connection Profile, and each card shows the business network that may be accessed using the displayed Identity via the Connect now option. A Business Network Card may be deleted or exported using the icons present on the card.
Here is a Business Network Card that may be used to connect to the business network named 'my-business-network' using the Identity 'New User'
A Business Network Card can be created when an Identity is issued within the Playground. This Business Network Card can then be exported and shared with others, allowing them to connect to the business network using the issued identity. If a user is provided with an Enrollment ID and Secret by an administrator, which corresponds to a valid Identity within a business network, then a Business Network Card may be directly created in the Playground. It is also possible to manually create a Business Network Card.
Creating a peer admin card using Playground
Deploying a business network to a Hyperledger Fabric instance for the first time requires that the Hyperledger Composer chaincode be installed on the relevant Hyperledger Fabric peers, and that the business network then be instantiated on the channel. This process requires special Hyperledger Fabric privileges possessed by a peer or channel administrator.
A peer admin business network card must be created in order to deploy a Hyperledger Composer business network to a Hyperledger Fabric instance. To create the peer admin business network card:
From the My Business Networks screen, click Create Business Network Card.
Select Hyperledger Fabric v1.2 and click Next.
Enter the details of your connection profile. For a better understanding of creating a connection profile, see Deploying to Hyperledger Fabric and click Next.
Select Certificates and upload the certificate and private key information for the peer admin identity. The Deploying to Hyperledger Fabric tutorial gives an overview of where to find the correct certificates.
Enter a name for the business network card.
Select Admin Card, and then Peer Admin and Channel Admin.
Click Next
The peer admin card should now be present in your My Business Networks screen. You can now deploy a business network to the Hyperledger Fabric instance using Playground.
Providing Access To Your Business Network With a Business Network Card
Access to your Business Network is granted to another user through the provision of a Business Network Card. Once created, the Business Network Card may be exported and provided to the user for whom the card was created.
There must be a Participant existing in the business network in order to bind an Identity required to create the Business Network Card.
When an identity is issued within Playground, there is an option to save the identity for use in your Business Networks page. By selecting this option a Business Network Card is created for the issued identity that is valid for the current business network. The Business Network Card will appear on your Business Networks page once you log out of the current business network, and it is from this location where it may be exported to share with another user.
Creating a Business Network Card
From the Business Networks page, select an identity to use to connect to your business network. Click Connect Now. Please note: You must use an identity that has permission to create new identities.
If required, create the participant to which you intend to assign the identity:
- Click the Test tab, and click Create New Participant.
- Complete the Participant definition and click Create New.
Click the name of your identity in the upper right, and click ID Registry within the drop down.
Click +Issue New ID.
Choose an ID Name, and input an existing Participant to associate the new identity with. A look-ahead service is provided to auto-complete on known Participants.
Click Create New.
Click Add to My Wallet. Adding the Business Network Card to your Business Networks page allows you to use it to connect to the business network, or export it for someone else to use.
The Business Networks page should now show the new Business Network Card.
Exporting a Business Network Card
Business Network Cards are exported from the Business Networks page in Playground, through interaction with the Business Network Card that you wish to export and is a one-step process.
- On the Business Networks page, click the Export icon on the Business Network Card you wish to export. The Business Network Card should download as a
.cardfile.
Please note: If you export a Business Network Card that has never been used, for example to send to a new participant, it will contain the enrollment ID and enrollment secret required to obtain the certificate and private key which are then used to identify Participants. Alternatively, if you export a Business Network Card that has been used before, it will already contain the certificate and private key. For more information on Participants and Identities, please see our main documentation.
Important: Exported identity cards should be handled with care since they contain unprotected credentials. We recommend that you only send identity cards that have been encrypted.
Gaining Access To A Business Network
Importing a Business Network Card
Importing a Business Network Card allows you to connect to a deployed business network.
On the Business Networks page, click Import Business Network Card in the upper right.
Drag and drop, or browse, to select a Business Network Card (
.card) file to import. Click Import.
The Business Network Card should now be visible in your Business Networks page; you can now connect to the deployed Business Network.
Connecting using Credentials
There are two ways a Business Network Card can be created from the Business Networks page.
A Business Network Card can be created using certificates, which requires the following: a certificate and private key, provided by an admin of a business network; a name for the Business Network Card; the business network name for which the credentials are valid; the Connection Profile details for the runtime on which the target business network is deployed.
To create a Business Network Card from the Business Networks page using certificates:
After receiving a certificate and private key, click the Connect using credentials button in the upper right of the Business Networks page.
If you have previously connected to the deployed runtime, select it from the displayed list, click Next and proceed to step 4; otherwise select the radio option to connect to a new Blockchain and click Next.
Specify the Connection Profile details that were provided to you and click Save.
Enter the certificate, private key, an Business Network Card name and business network name, and click Create.
The Business Network Card should now be displayed in the Business Networks page.
Manually Creating a Business Network Card
Business Network Cards are archive (.zip) files containing up to three elements:
- A Connection Profile. (
.json) - A metadata file containing the data for the Identity to use to connect to the Business Network. (
metadata.json) - An optional credentials directory containing a certificate and private key.
Please note: If there is no credentials directory, the metadata file must contain the Enrollment Secret property with the property name enrollmentSecret. If an enrollmentSecret is specified, a credentials directory with certificates will be created and populated if the Business Network Card is exported.
The metadata file should take the following format:
{
    "name": "PeerAdmin",
    "description": "A valid Business Network Card",
    "businessNetwork": "basic-sample-network",
    "enrollmentId": "UserID",
    "enrollmentSecret": "UserSecret",
    "roles": [

    ]
}
The businessNetworkName, image, enrollmentSecret, and roles properties are optional. The available roles are PeerAdmin and ChannelAdmin.
To create the Business Network Card file, compress the Connection Profile, metadata file, and optionally a credentials directory, then modify the file type to .card.
This Business Network Card can now be imported using the Hyperledger Composer Playground.